Python

Inserting graphviz diagrams in a CVStrac wiki

CVStrac is an amazing productivity booster for any software development group. This simple tool, built around a SQLite database (indeed, by the author of SQLite) combines a bug-tracking database, a CVS browser and a wiki. The three components are fully cross-referenced and build off the strengths of each other. You can handle almost all aspects of the software development process in it, and since it is built on an open database with a radically simple schema, it is trivial to extend. I use CVStrac for Temboz to track bugs, but also to trace changes in the code base to requirements or to bugs, and last but not least, the wiki makes documentation a snap.

For historical reasons, my company uses TWiki for its wiki needs. We configured Apache with mod_rewrite so that the wiki links from CVStrac lead to the corresponding TWiki entry instead of the one in CVStrac itself, which is unused. TWiki is very messy (not surprising, as it is written in Perl), but it has a number of good features like excellent search (it even handles stemming) and a directed graph plug-in that makes it easy to design complex graphs using Bell Labs’ graphviz, without having to deal with the tedious pixel-pushing of GUI tools like Visio or OmniGraffle. The plug-in makes it easy to document UML or E-R graphs, document software dependencies, map process flows and the like.

CVStrac 2.0 introduced extensibility in the wiki syntax via external programs. This allowed me to implement similar functionality in the CVStrac native wiki. To use it, you need to:

  1. Download the Python script dot.py and install it somewhere in your path. The sole dependency is graphviz itself, as well as either pysqlite2 or the built-in version bundled with Python 2.5
  2. create a custom wiki markup in the CVStrac setup, of type “Program Block”, with the formatter command-line:
    path/dot.py –db CVStrac_database_file –name ‘%m’
    • Insert the graphs using standard dot syntax, bracketed between CVStrac {dot} and {enddot} tags.
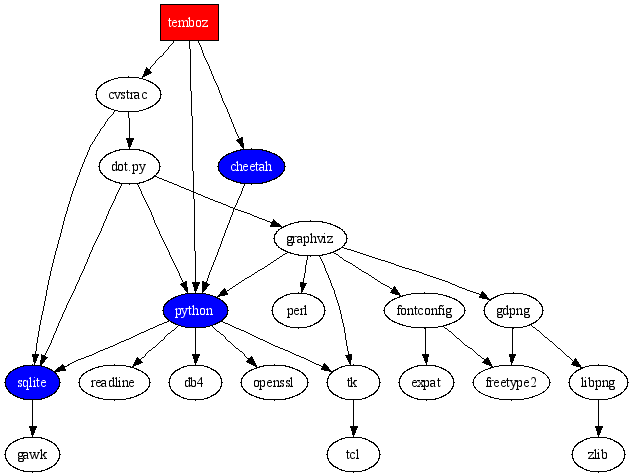
For examples of the plugin at work, here is the graph corresponding to this markup:
{dot}
digraph sw_dependencies {
style=bold;
dpi=72;

temboz [fontcolor=white,style=filled,shape=box,fillcolor=red];
python [fontcolor=white,style=filled,fillcolor=blue];
cheetah [fontcolor=white,style=filled,fillcolor=blue];
sqlite [fontcolor=white,style=filled,fillcolor=blue];

temboz -> cheetah -> python;
temboz -> python -> sqlite -> gawk;
temboz -> cvstrac -> sqlite;
python -> readline;
python -> db4;
python -> openssl;
python -> tk -> tcl;

cvstrac -> "dot.py" -> graphviz -> tk;
"dot.py" -> python;
"dot.py" -> sqlite;
graphviz -> gdpng;
graphviz -> fontconfig -> freetype2;
fontconfig -> expat;
graphviz -> perl;
graphviz -> python;
gdpng -> libpng -> zlib;
gdpng -> freetype2;
}
{enddot}
Dot

Another useful plug-in for CVStrac I wrote is one that highlights source code in the CVS browser using the Pygments library. Simply download pygmentize.py, install it Setup/Diff & Filter Programs/File Filter, using the string path_to/pygmentize.py %F. Here is an example of Pygment applied to pygmentize.py itself:

#!/usr/bin/env python
# $Log: pygmentize.py,v $
# Revision 1.3  2007/07/04 19:54:26  majid
# cope with Unicode characters in source
#
# Revision 1.2  2006/12/23 03:51:03  majid
# import pygments.lexers and pygments.formatters explicitly due to Pygments 0.6
#
# Revision 1.1  2006/12/05 20:19:57  majid
# Initial revision
#
"""
CVStrac plugin to Pygmentize source code
"""
import sys, pygments, pygments.lexers, pygments.formatters

def main():
  assert len(sys.argv) == 2
  block = sys.stdin.read()
  try:
    lexer = pygments.lexers.get_lexer_for_filename(sys.argv[1])
    out = pygments.highlight
    block = pygments.highlight(
      block, lexer, pygments.formatters.HtmlFormatter(
      style='colorful', linenos=True, full=True))
  except ValueError:
    pass
  print unicode(block).encode('ascii', 'xmlcharrefreplace')

if __name__ == '__main__':
  main()

A Python driver for the Symbol CS 1504 bar code scanner

One of my cousins works for Symbol, the world’s largest bar code reader manufacturer. The fashionable action today is in RFID, but the humble bar code is relatively untapped at the consumer level. The unexpected success of Delicious Library shows people want to manage their collection of books, CDs and DVDs, and as with businesses, scanning bar codes is the fastest and least error-prone way to do so. Delicious Library supports scanning bar codes with an Apple iSight camera, but you have to wonder how reliable that is.

If you want something more reliable, you need a dedicated bar code scanner. They come in a bewildering array of sizes and shapes, from thin wands to pistol-like models or flat ones like those used at your supermarket checkout counter. For some reason, the bar code scanner world seems stuck in the era of serial ports (or worse, PS/2 keyboard wedges), but USB models are available, starting at $70 or so. They emulate a keyboard – when you scan a bar code, they will type in the code (as printed on the label), character by character so as to not overwhelm the application, and follow with a carriage return, which means they can work with almost anything from terminal-based applications to web pages. Ingeniously, most will allow you to program the reader’s settings using a booklet of special bar codes that perform changes like enabling or disabling ISBN decoding, and so on.

The problem with tethered bar code readers is, they are not very convenient if you are trying to catalog items on a bookshelf or read in UPC codes in a supermarket. Symbol has a unit buried deep inside its product catalog, the CS 1504 consumer scanner. This tiny unit (shown below with a canister of 35mm film for size comparison) can be worn on a key chain, although I would worry about damaging the plastic window. Most bar code readers are hulking beasts in comparison. It has a laser bar code scanner: just align the line it projects with the bar code and it will chirp once it has read and memorized the code. The memory capacity is up to 150 bar code scans with timestamps, or 300 without timestamps. The 4 silver button batteries (included) are rated for 5000 scans — AAA would have been preferable, but I guess the unit wouldn’t be so compact, but it is clear this scanner was not intended for heavy-duty commercial inventory tracking purposes.

I bought one to simplify the process of listing books with BookCrossing (even though their site is not optimized for bar code readers), but you have other interesting uses like finding out more about your daily purchases such as nutritional information or whether the company behind them engages in objectionable business practices. I can also imagine sticking preprinted bar-coded asset tracking tags on inventory (e.g. computers in the case of an IT department), and keeping track of them with this gizmo. People who sell a lot of books or used records through Amazon.com can also benefit as Amazon has a bulk listing service to which you can upload a file with barcodes. An interesting related service is the free UPC database.

Symbol CS 1504
You can order the scanner in either serial ($100) or USB ($110) versions, significantly cheaper than the competition like Intelliscanner (and much smaller to boot). I highly recommend the USB version, even if you have a serial port today — serial ports seem to be going the way of the dodo and your next computer may not have one. The USB version costs slightly more, but that’s because they include a USB-Serial adapter, and you can’t get one retailing for a mere $10. The one shipped with my unit is the newer PN50 cable which uses a Prolific 2303 chipset rather than the older Digi adapter. Wonder of wonders, they even have a

Mac OS X driver available.

The scanner ships without any software. Symbol mostly sells through integrators to corporations that buy hundreds or thousands of bar code scanners for inventory or point of sale purposes, and they are not really geared to be a direct to consumer business with all the customer support hassles that entails. There are a number of programs available, mostly for Windows, but they don’t seem to have that much by way of functionality to justify their high prices, often as expensive as the scanner itself.

Symbol does make available a SDK to access the scanner, including complete documentation of the protocol used for the device. While you do have to register, they do not make you go through the ridiculous hoops you have to pass to access to the Photoshop plug-in SDK or the Canon RAW decoding SDK. The supplied libraries are Windows-only, however, so I wrote a Python script that works on both Windows and Mac OS X (and probably most UNIX implementations as well, although you will have to use a serial port). The only dependency is the pySerial module.

By default, it will set the clock on the scanner, retrieve the recorded bar codes, correct the timestamps for any drift between the CS 1504’s internal clock and that of the host computer, and if successful clear the unit’s memory and dump the acquired bar codes in CSV format to standard output. The script will also decode ISBN codes (the CS 1504 does not appear to do this by itself in its default configuration). As it is written in Python, it can easily be extended, although it is probably easier to work off the CSV file.

The only configuration you have to do is set the serial port to use at the top of the script (it should do the right thing on a Mac using the Prolific driver, and the Windows driver seems to always use COM8 but I have no way of knowing if this is by design or coincidence). The program is still very rough, specially as concerns error recovery, and I appreciate any feedback.

A sample session follows:

ormag ~>python cs1504.py > barcodes.csv
Using device /dev/cu.usbserial...  connected
serial# 000100000003be95
SW version NBRIKAAE
reading clock for drift
clock drift 0:00:01.309451
resetting scanner clock... done
reading barcodes... done (2 read)
clearing barcodes... done
powering down... done

ormag ~>cat barcodes.csv
UPCA,034571575179,2006-03-27 01:08:48
ISBN,1892391198,2006-03-27 01:08:52

Update (2006-07-21):

At the prompting of some Windows users, I made a slightly modified version, win_cs1504.py, that will copy the barcodes to the clipboard, and also insert the symbology, barcode and timestamp starting on the first free line in the active Excel spreadsheet (creating one if necessary).

Update (2007-01-20):

Just to make it clear: I hereby place this code in the public domain.

Update (2009-11-06):

For Windows users, I have put up videos describing how to install the Prolific USB to serial driver, Python and requisite extensions, and how to use the program itself.

Update (2012-07-05):

I moved the script over to GitHub. Please file bug reports and enhancement requests there. Fatherhood and a startup don’t leave me much time to maintain this, so I make no promises, but this should allow people who make fixes to contribute them back (or fork).

A reader-writer lock for Python

Python offers a number of useful synchronization primitives in the threading and Queue modules. One that is missing, however, is a simple reader-writer lock (RWLock). A RWLock allows improved concurrency over a simple mutex, and is useful for objects that have high read-to-write ratios like database caches.

Surprisingly, I haven’t been able to find any implementation of these semantics, so I rolled my own in a module rwlock.py to implement a RWLock class, along with lock promotion/demotion. Hopefully it can be added to the standard library threading module. This code is hereby placed in the public domain.

"""Simple reader-writer locks in Python
Many readers can hold the lock XOR one and only one writer"""
import threading

version = """$Id: 04-1.html,v 1.3 2006/12/05 17:45:12 majid Exp $"""

class RWLock:
  """
A simple reader-writer lock Several readers can hold the lock
simultaneously, XOR one writer. Write locks have priority over reads to
prevent write starvation.
"""
  def __init__(self):
    self.rwlock = 0
    self.writers_waiting = 0
    self.monitor = threading.Lock()
    self.readers_ok = threading.Condition(self.monitor)
    self.writers_ok = threading.Condition(self.monitor)
  def acquire_read(self):
    """Acquire a read lock. Several threads can hold this typeof lock.
It is exclusive with write locks."""
    self.monitor.acquire()
    while self.rwlock < 0 or self.writers_waiting:
      self.readers_ok.wait()
    self.rwlock += 1
    self.monitor.release()
  def acquire_write(self):
    """Acquire a write lock. Only one thread can hold this lock, and
only when no read locks are also held."""
    self.monitor.acquire()
    while self.rwlock != 0:
      self.writers_waiting += 1
      self.writers_ok.wait()
      self.writers_waiting -= 1
    self.rwlock = -1
    self.monitor.release()
  def promote(self):
    """Promote an already-acquired read lock to a write lock
    WARNING: it is very easy to deadlock with this method"""
    self.monitor.acquire()
    self.rwlock -= 1
    while self.rwlock != 0:
      self.writers_waiting += 1
      self.writers_ok.wait()
      self.writers_waiting -= 1
    self.rwlock = -1
    self.monitor.release()
  def demote(self):
    """Demote an already-acquired write lock to a read lock"""
    self.monitor.acquire()
    self.rwlock = 1
    self.readers_ok.notifyAll()
    self.monitor.release()
  def release(self):
    """Release a lock, whether read or write."""
    self.monitor.acquire()
    if self.rwlock < 0:
      self.rwlock = 0
    else:
      self.rwlock -= 1
    wake_writers = self.writers_waiting and self.rwlock == 0
    wake_readers = self.writers_waiting == 0
    self.monitor.release()
    if wake_writers:
      self.writers_ok.acquire()
      self.writers_ok.notify()
      self.writers_ok.release()
    elif wake_readers:
      self.readers_ok.acquire()
      self.readers_ok.notifyAll()
      self.readers_ok.release()

if __name__ == '__main__':
  import time
  rwl = RWLock()
  class Reader(threading.Thread):
    def run(self):
      print self, 'start'
      rwl.acquire_read()
      print self, 'acquired'
      time.sleep(5)
      print self, 'stop'
      rwl.release()
  class Writer(threading.Thread):
    def run(self):
      print self, 'start'
      rwl.acquire_write()
      print self, 'acquired'
      time.sleep(10)
      print self, 'stop'
      rwl.release()
  class ReaderWriter(threading.Thread):
    def run(self):
      print self, 'start'
      rwl.acquire_read()
      print self, 'acquired'
      time.sleep(5)
      rwl.promote()
      print self, 'promoted'
      time.sleep(5)
      print self, 'stop'
      rwl.release()
  class WriterReader(threading.Thread):
    def run(self):
      print self, 'start'
      rwl.acquire_write()
      print self, 'acquired'
      time.sleep(10)
      print self, 'demoted'
      rwl.demote()
      time.sleep(10)
      print self, 'stop'
      rwl.release()
  Reader().start()
  time.sleep(1)
  Reader().start()
  time.sleep(1)
  ReaderWriter().start()
  time.sleep(1)
  WriterReader().start()
  time.sleep(1)
  Reader().start()

Threadframe: multithreaded stack frame extraction for Python

Note: threadframe is obsolete. Python 2.5 and later include a function sys._current_frames() that does the same thing. Threadframe is only useful for Python 2.2 through 2.4.

Rationale

I was encountering deadlocks in a multi-threaded CORBA server (implemented using omniORB). Debugging using GDB gave me too low-level information, and what I needed was an equivalent of the GDB command “info threads”. There was no such facility available from within Python’s standard library, so I rolled my own.

David Beazley added advanced debugging functions to the Python interpreter, and they have been folded into the 2.2 release.

I used these hooks to build a debugging module that is useful when you are looking for deadlocks in a multithreaded application. It basically has a single function that will return a list of the stack frames for all Python interpreter threads in the process.

Guido van Rossum added in Python 2.3 the thread ID to the interpreter state structure, and this allows us to produce a dictionary mapping thread IDs to frames.

This functionality is now integrated in Python 2.5’s batteries-included sys._current_frames() function.

Of course, I disclaim any liability if this code should crash your system, erase your homework, eat your dog (who also ate your homework) or otherwise have any undesirable effect.

Building and installing

Python 2.2 or later is required. Thread ID to frame dictionary extraction is only available in Python 2.3 and later, and will generate a NotImplementedError if used from 2.2.

Download the source tarball threadframe-0.2.tar.gz. You can use the Makefile or directly with the setup.py script. I have built and tested this only on Solaris 8/x86 and Windows 2000, but the code should be pretty portable. There is a small test program test.py that illustrates how to use this module to dump stack frames of all the Python interpreter threads. A sample run is available for your perusal.

For Windows users, I have available pre-compiled binaries, built using Mingw32 and GCC 2.95.2. Just copy the file threadframe.pyd in any location in your Python path and you should be able to run the test script test.py.

Windows binaries
Python versionDownload
2.2.1 threadframe.pyd
2.3.4 threadframe.pyd
2.4.x threadframe.pyd

License

This code is licensed under the same terms as Python itself.

Change history

Release 0.2 (2004-06-10)

Distutils based setup.py contributed by Bob Ippolito. Bob also noticed that thread_id was added to the Python interpreter state, and contributed a patch to get a dictionary mapping thread_ids to frames instead of a list.

Release 0.1 (2002-10-11)

Initial release for Python 2.2: threadframe-0.1.tar.gz